Here are the steps to follow to set up a new workspace for pre-accounting with Sway Finance.
The whole process takes 10 to 20 minutes, depending on the number and type of bank accounts you add.
If you have any questions, you can contact Sway Finance at any time:
- By telephone or e-mail, see our contact page.
- Via the interactive chat feature in the Sway app by clicking on the "Ask Support" button at the bottom left of the menu bar.
💡 If you do not yet have a user account, start by registering at https://business.swayapp.io/sign-up. You will be prompted to create a workspace at the end of the process.
1. From your existing workspace, click on the selector in the top left corner, then select "Create a workspace".
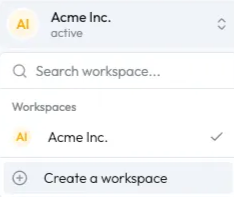
2. Enter the name of your workspace and click on the "Create workspace" button.

✅ The new workspace has been created!
💡 To set up a bank account, you must either have the e-banking credentials to connect the account or have the account number to create a manual account.
1. In the menu on the left, select the "Bank accounts" entry.

2. Click on the blue "Add account" button and select the "Live bank account" option.

3. Select the country, then the bank. Follow the steps on your bank platform to connect the desired bank account to Sway Finance.
1. Navigate to the bank accounts screen, as described in step (1) above.
2. Click on the blue "Add account" button and select the "Manual bank account" option.
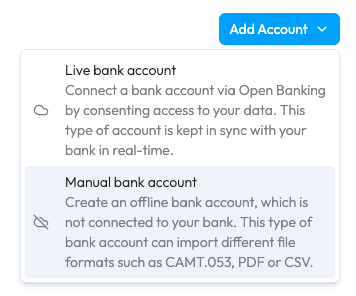
3. Select the country, then the bank. Complete the account information (name, IBAN, etc.) and submit the form: the account is created and ready to receive data.

To learn how to add data to your offline account, please refer to the dedicated FAQ.

1. In the menu on the left, navigate to the workspace settings ("Settings"), then the submenu "Accounting settings" (accounting information).
2. Select your VAT scheme:
1. Cash basis
2. Accrual basis (currently not supported)
3. Net tax rate
4. Flat tax rate
3. Then navigate to the "Chart of accounts" submenu.
4. There, you'll have the choice to:
a. Use a standard chart of accounts (by clicking on the blue text at the bottom);
b. Upload your own chart of accounts by clicking on the blue "Upload" button.

5. Once you have selected one of the two options, you can check that the chart of accounts is displayed correctly and save it by clicking on the blue "Create chart of accounts" button.
6. Last step: you must assign at least one bank account to one of your accounting accounts and define a suspense account:

i. Click on the first item in the blue list above the chart of accounts: "Link at least one bank account (...)": a pop-up window will appear.

ii. Select a bank account and your corresponding bank account in Sway. Click on the "Link bank account" button.
iii. Click on the second link, "Designate or create a suspense account", and a second pop-up window will appear.
iv. If you already have a suspense account defined in your chart of accounts, you can select it from the list.
v. Otherwise, click on the blue text "Or add a new account instead".
vi. In this last pop-up window, enter an account number (e.g. 1099) and a name (e.g. "Suspense account"). The other fields can be ignored.
vii. Click on Add account.
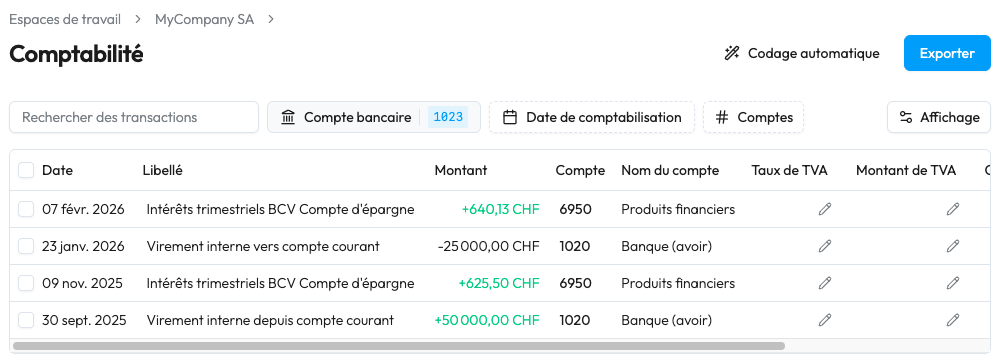
You can access the "Accounting" menu, where you will find all the transactions for the account(s) you defined above. You will be able to access automatic encoding functions (based on AI and the rules you define), as well as export to your preferred accounting tool.
💡 If you cannot find the "Accounting" menu item, please contact Sway Finance (you can use the integrated chat): this feature is activated upon request by our partners.
With Sway Finance's accounting module, you can leverage the AI-powered encoding of entries, and then export it in your favourite accounting tool format, such as Winbiz, Crésus, WinEUR, or even Abacus.
To do so, simply click the blue "Export" button in the top right corner of the accounting page.
A dialog window appears where you can chose:
This last option is useful depending on your accounting tool's configuration, in order to avoid encoding errors and odd characters appearing in place of the accents.
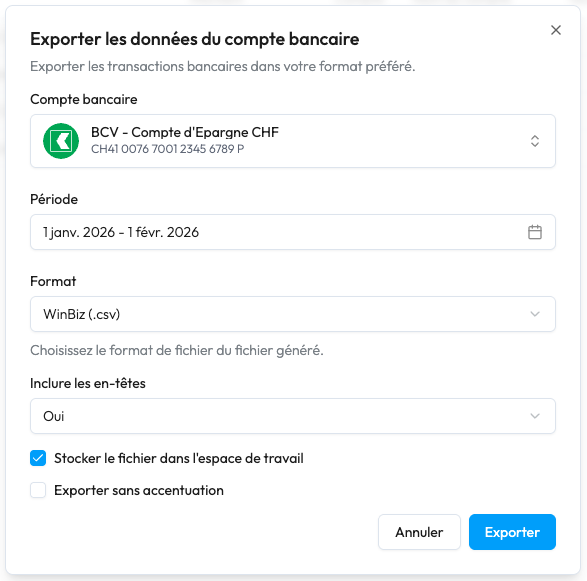
In addition to the accounting-tool-based formats, a CSV export is also available to serve as an archive, for instance, and/or to be imported back into a Sway Finance Workspace.
Winbiz is a well established accounting software in Switzerland. You can easily optimise your pre-accounting workflows by using Sway Finance:
Here's how to proceed:
1. Open the chart of accounts (from the Accounting tab).
2. Go to the "Tools" tab, then "Import, Export" > "Export".

3. Check the tabs:
a. Export to...
i. Select the correct destination folder (to find the chart of accounts once exported)
ii. File type: “Semicolon-delimited with quotation marks”
b. Export options:
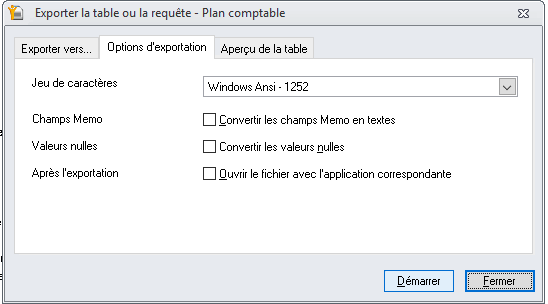
i. Choose Windows ANSI - 1252 format
ii. Keep all boxes unchecked (Memo Fields, Null Values, After Export).
4. Click on Start.
✅ A CSV file is generated. You can import it directly into Sway Finance in the workspace settings and the "Chart of accounts" submenu.
Crésus is a well established accounting solution in Switzerland. You can easily streamline your pre-accounting process by using Sway Finance:
Here's how to proceed:
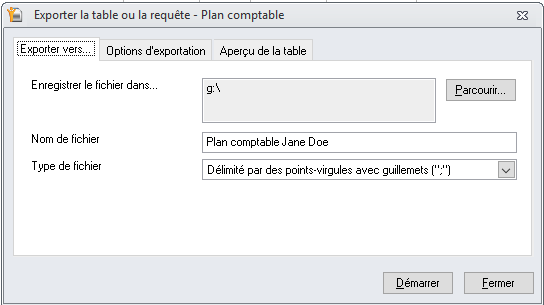
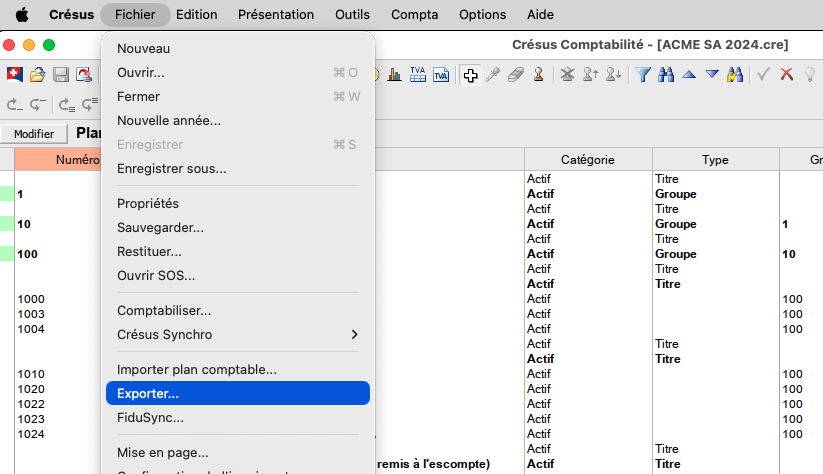
1. From the chart of accounts view, go to the "File" menu, then "Export...".
2. Tick the box “Export column names”
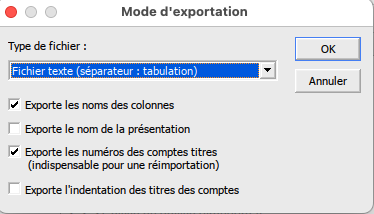
3. Click the"OK" button
A .txt file is generated. You can import it directly into Sway in the workspace settings, in the "Chart of accounts" submenu.
It's easy to export your WinEUR chart of accounts to import it into a third-party tool such as Sway Finance. For example, you can automate the coding of accounting lines using our AI algorithms and then import them into WinEUR, saving you valuable time.
To export the WinEUR chart of accounts in XML format:
1. In the main menu of the selected company, open the "Import/Export" submenu and select "Import/Export XML".
2. Select the default format and click "Change" (A) or create a new format (B):

3. In the "Export" submenu:
i. Select items to be exported > "Without entries".
ii. Deactivate all options except "Export general ledger accounts" and "Export tax codes".

4. Close this window and then click on the ‘Export’ button. The export window will open.
5. Enter the name and/or location of your file (you can restore it later if you use GIT Cloud).
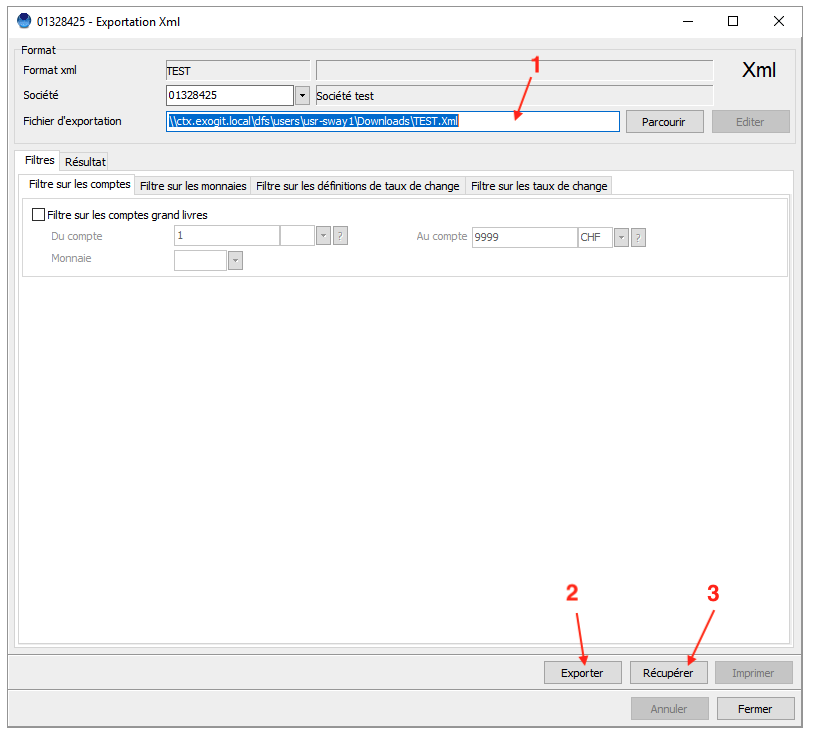
6. Click on "Export" and then on "Retrieve (GIT Cloud)" to retrieve your chart of accounts exported in XML format.
Leveraging the automated pre-accounting features from Sway, you can then easily import them into your favourite accounting tool, such as Crésus. After opening your accounting folder, proceed as described below.
From the Journal view, select File > Import Entries... from the top menu bar.

Then select the file you exported from Sway previously (see dedicated article here).

For VAT-registered accounts, select the option Automatic creation of VAT entries > With VAT (gross).

After clicking Import, your entries will be displayed in the journal.
If you encounter encoding issues (accents replaced by unusual characters), make sure to tick the option to export transactions without accents within Sway Finance. Refer to the article on this page to see how to proceed.
After having automatically encoded your accounting lines with Sway Finance, you can seamlessly export them into the Winbiz format and import them into your accounting.
Simply follow these steps.:
1. From the accounting tab, open the accounting entries.
2. Click Action > import, export > standard import.
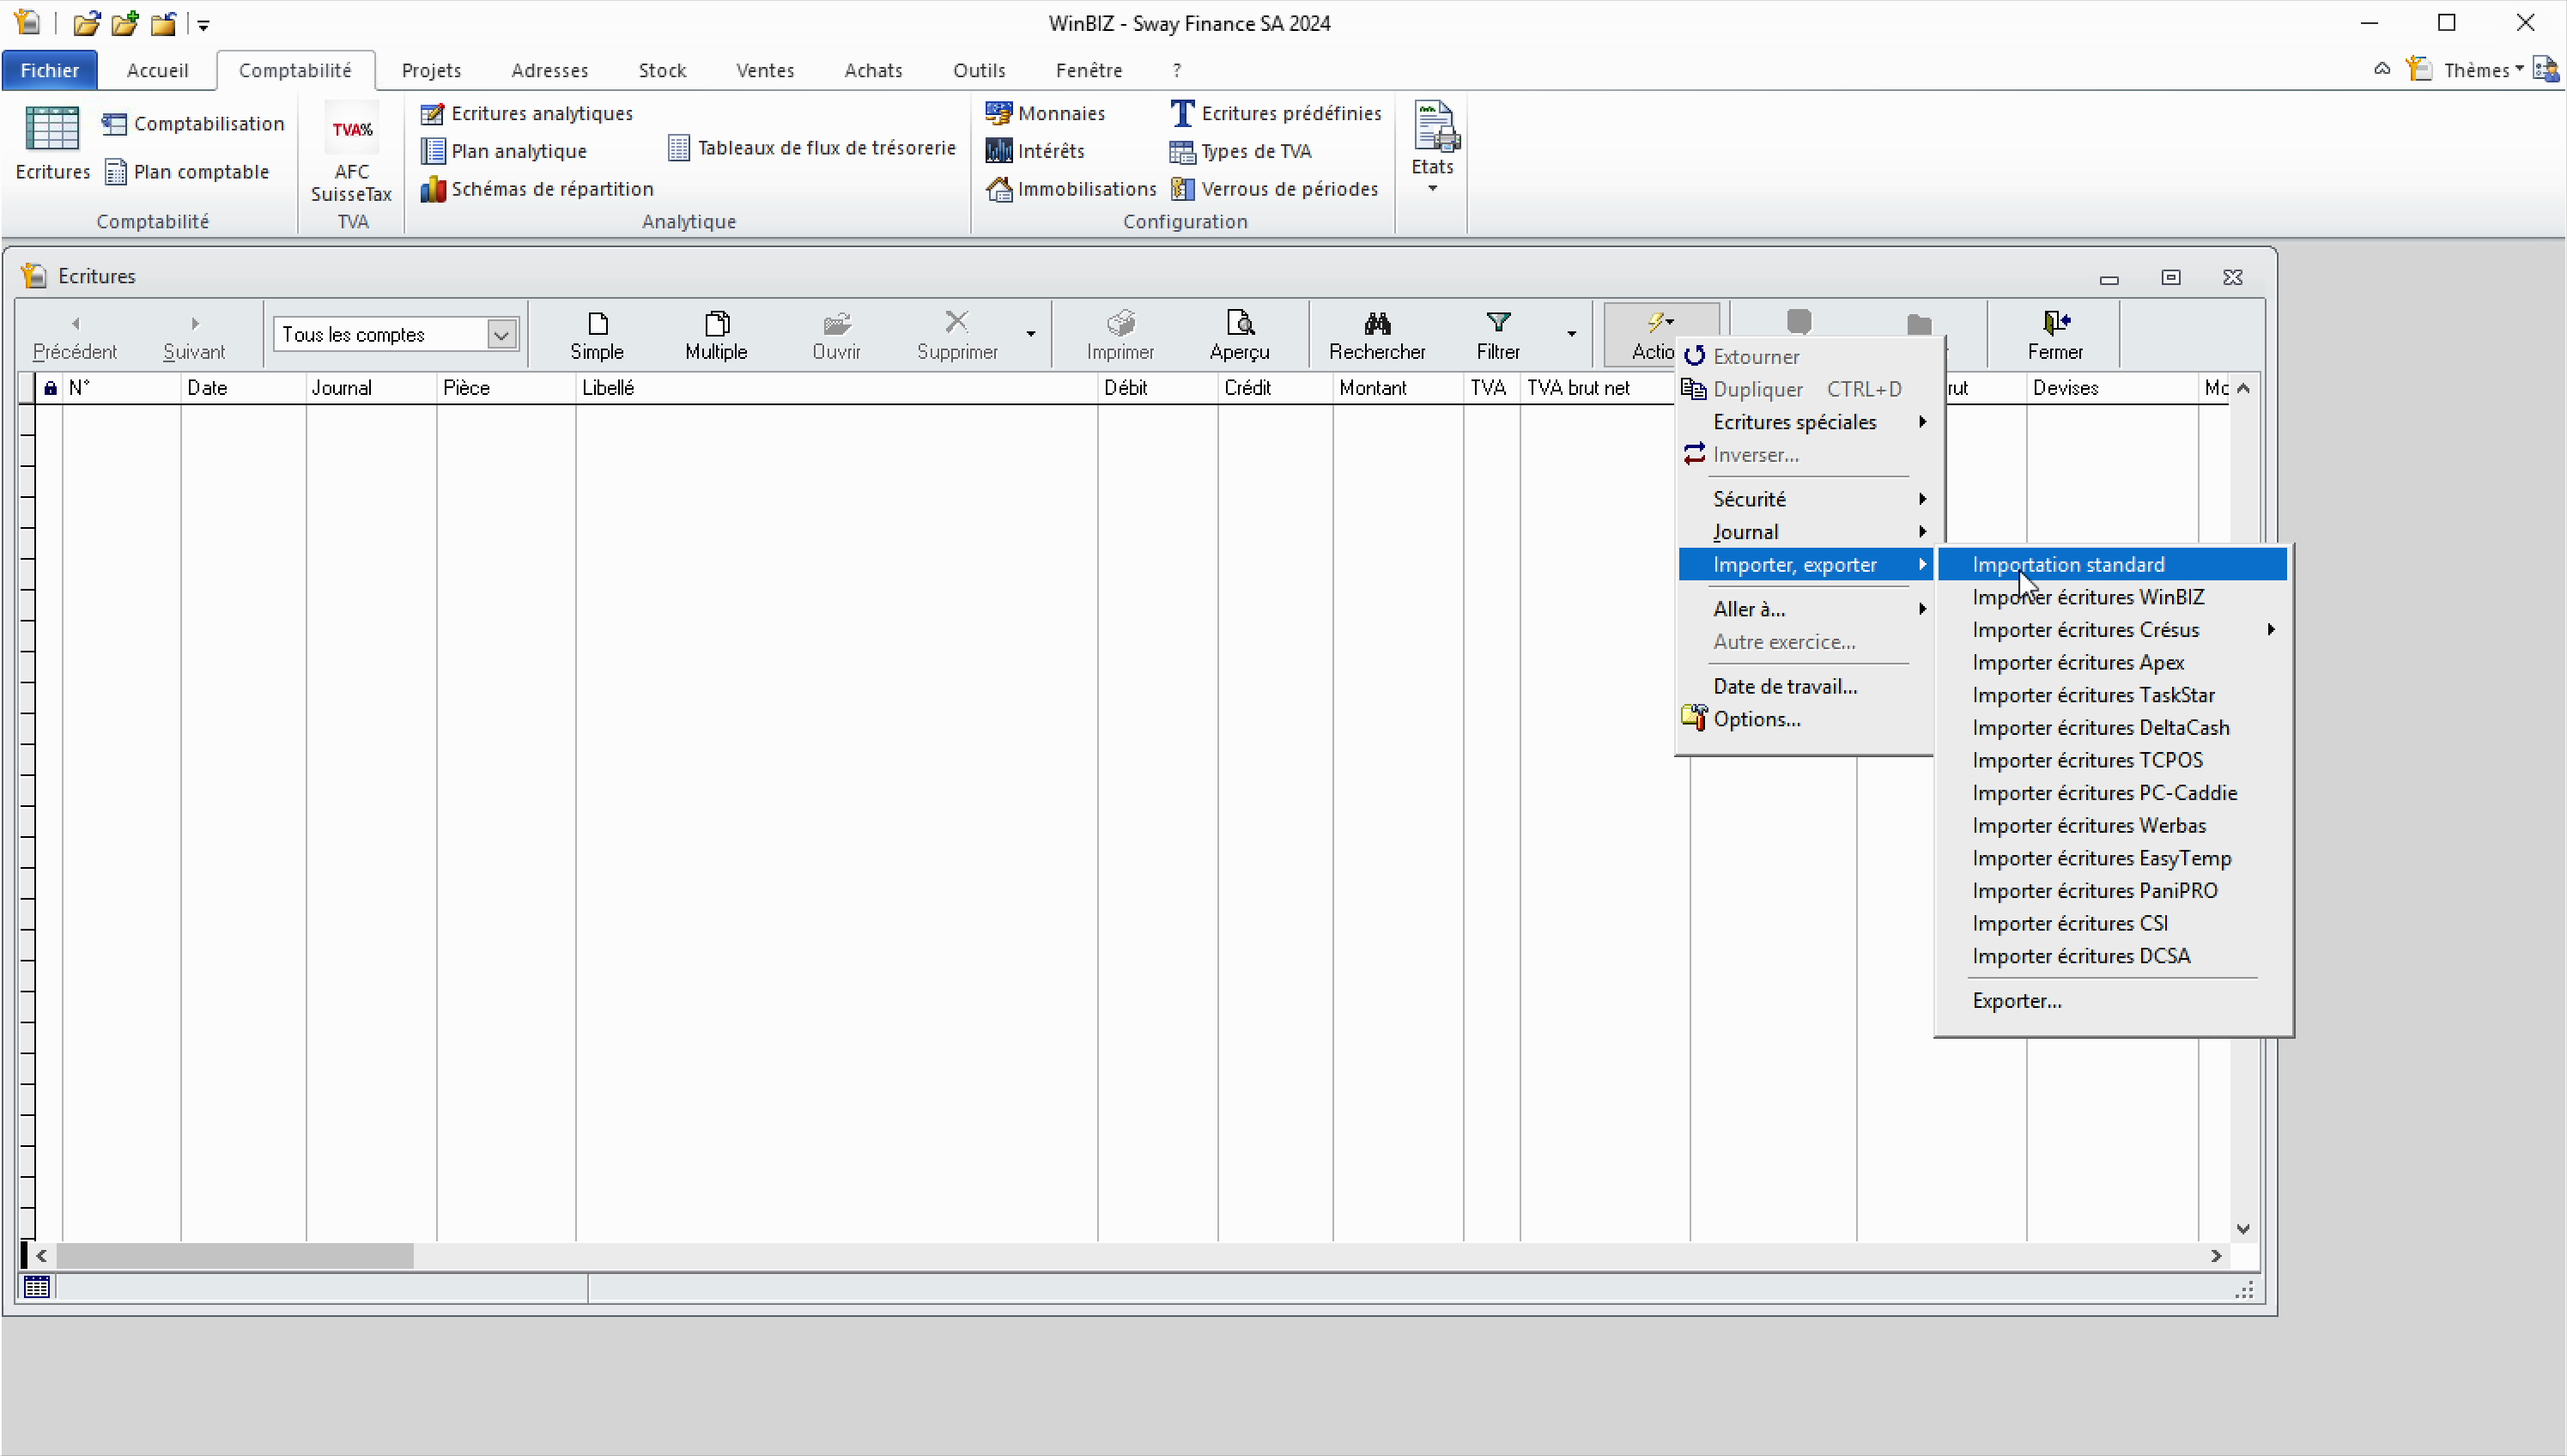
3. In the import parameters, make sure to select the correct file format. If you exported your data from Sway, select semicolon separators and UTF-8 conversion.
4. Once the import is complete, a success message will confirm the number of imported transactions.
Note:
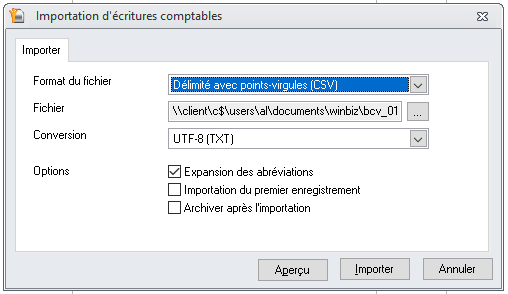
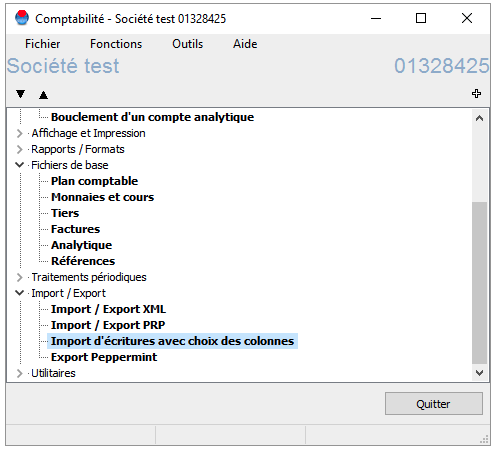
1. From the global menu of the selected company, open the import/export submenu and select "Import entries with column selection".
2. Configure or verify the configuration:
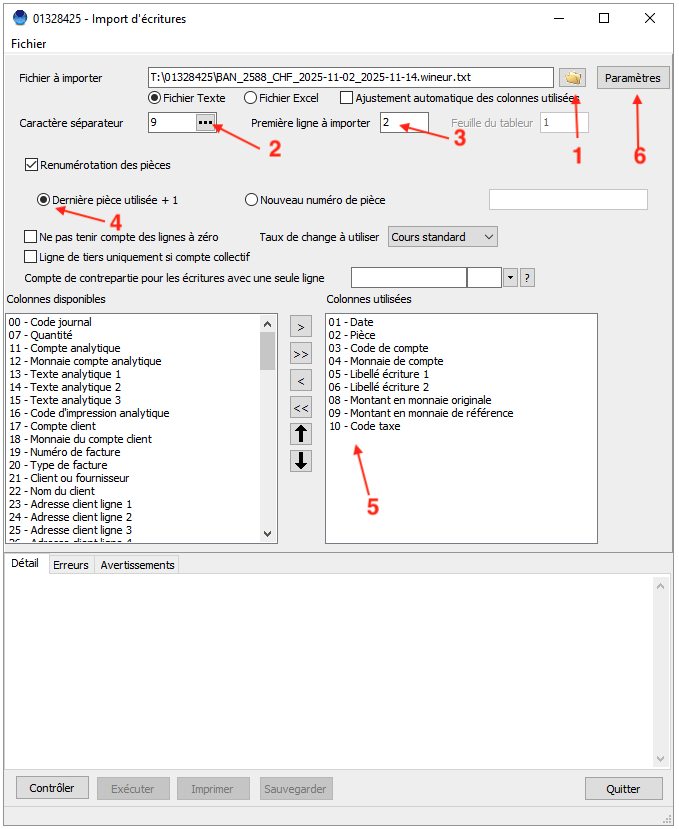
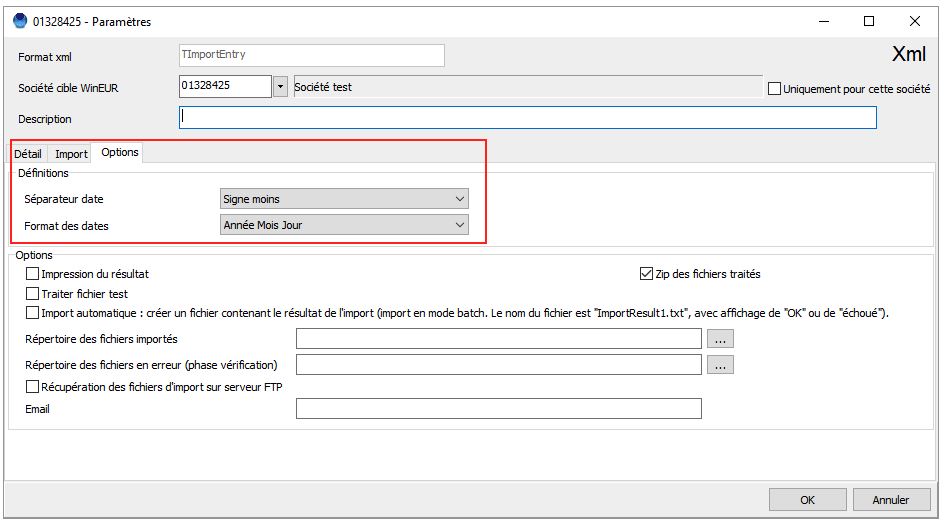
3. Under "Options", check that the selected date separator is "Minus sign" and the date format is "Year Month Day". Click "OK".
4. Click on "Check" (number 1 in the screenshot below); no errors should be displayed. If errors are displayed, check your configuration in the previous steps. Contact GIT or Sway Finance support if the error persists.
5. Then click on "Run" (number 2 in the screenshot below). The transactions are imported.
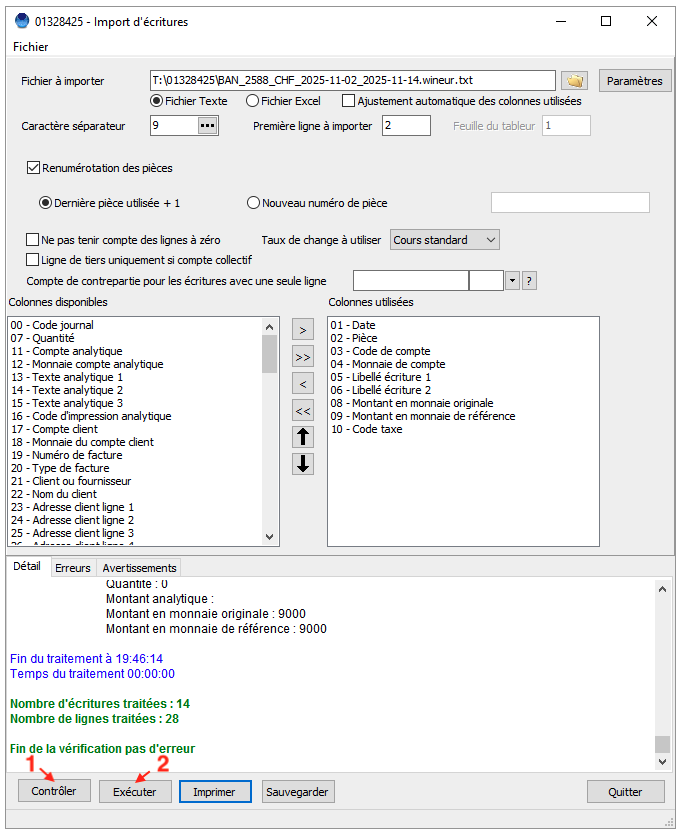
6. From the main menu, you can click on "Entry of entries" to view the imported entries.
1. From the global menu of the selected company, open the Utilities submenu > "Company settings".
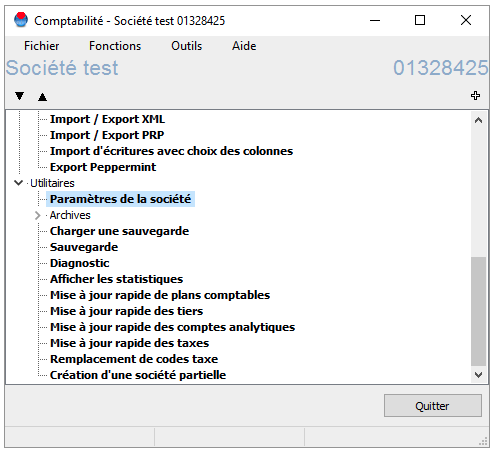
2. In the Accounting > General Ledger > Entry Settings submenu, you can define the numbering of accounting documents. Choose a meaningful keyword and/or simply enter a starting number.
3. Also check that the "Sequential Numbering" option is selected.

4. Click OK. WinEUR will automatically number the documents by incrementing the value from the number you specified.
Once you've signed up, created your workspace, and connected a first bank account, you can easily enable the Xero daily sync. Simply go through the steps below or follow along the video.
1. Invite the Sway Bot
2. Configure Xero Access
Your benefits
Once setup is complete, you'll benefit from:
On top of that, you can easily invite collaborators to your Sway Finance workspace to easily manage bills and invoices, submit payments to your banks and automate your cash management and accounting processes.
Complete setup takes 5-10 minutes and only needs to be done once. Your financial data will then flow seamlessly and securely between platforms.
Inviting the Sway Bot to your workspace will allow enabling workflow automations such as the parsing of PDF bank statements, the pre-processing of your data for accounting, or the synchronisation with third-party tools.
To do so, proceed as follows:
