

The Sway API lets your own software, such as a script or an agent, read and change the data of your workspaces without the web app. An API key identifies that software to Sway and acts on your behalf.
Before you start
- A licence that includes the Sway API. The base licence covers the whole platform; a higher tier adds the public API. Contact Sway to add it.
- Your keys are yours: a key reaches the workspaces that you belong to, with the rights of your role in each, so it never does more than you can do in the web app.
Create an API key
- Open the developer page. At the bottom of the sidebar, choose your name, then Profile, and Developer in the menu of the profile.
- Start a key. Choose Create API key. Before your first key, the page shows No API keys yet with the same button.
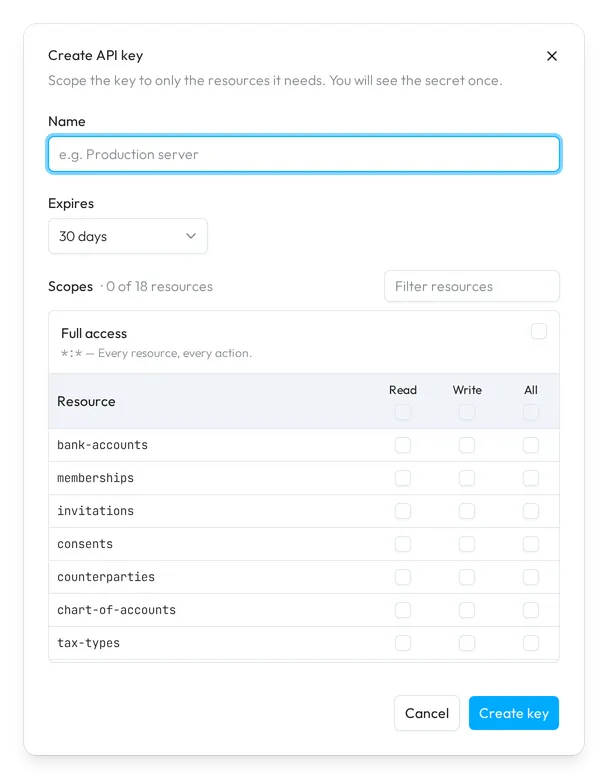
- Name the key. Under Name, describe the software that uses it, such as a production server.
- Set the expiry. Expires starts on 30 days. Choose another duration, No expiry or Custom date.
- Choose the scopes. Tick Full access, or the Read and Write boxes of each resource that the software needs.
- Create it and copy the secret. Choose Create key. API key created shows the Secret key: copy it, store it safely, then choose I have saved my key.
The secret shows once
Sway does not store the secret key, and the web app never shows it again once you close API key created. Anyone who holds it can act on your behalf through the Sway API: if you lose it, revoke the key and create a new one.
Scopes
A scope lets the key use one part of the API. Without Full access, a key needs at least one scope: the dialog says so when you tick none.
- Full access grants every resource and every action, including those that the API adds later. It greys out the table.
- The table lists the 18 resources of the API under their names in the API, such as the bank accounts, the counterparties or the invoices. Read lets the key read a resource; Write lets it create, change or delete. Write does not include Read: tick both, or All, for a key that does both.
- The boxes in the header row tick a whole column. Filter resources narrows the table, and the line beside Scopes counts the resources that you ticked, such as 3 of 18 resources.
The Developer page
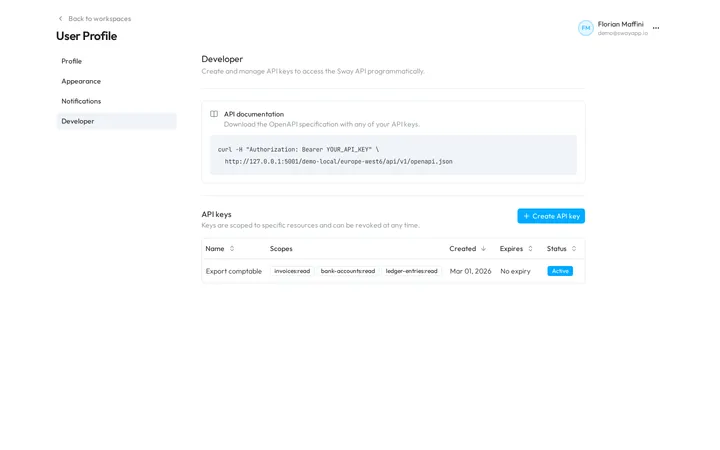
The API documentation card holds a command that downloads the OpenAPI specification of the Sway API. Replace its placeholder with one of your secret keys before you run it. The API reference shows the same specification, with no key needed. Authentication shows how your software sends a key, and which scope each endpoint needs.
To ask Claude about your workspaces, give one of your keys to the Claude connector.
The API keys table lists your keys, the newest first:
- Name and Scopes: the first three scopes of a key show, and +2 more opens the rest. A key with every right shows Full access.
- Created and Expires: the day of creation, and the expiry date or No expiry.
- Status: Active, Expired or Revoked. A key that is no longer active is greyed out and keeps its row.
Revoke a key
- Find the key. In the API keys table, find the row of the active key.
- Revoke it. Choose Revoke at the end of the row.
- Confirm it. Revoke API key? warns that the revocation breaks every integration that uses the key at once, and that it cannot be undone. Choose Revoke key.
The key stays in the table as Revoked. An expired key stops working in the same way: create a new key to replace it.
Fields
The Create API key dialog:
| Field | What it takes | Required |
|---|---|---|
| Name | The name of the key in the table, from 1 to 100 characters. | Yes |
| Expires | 30 days, 60 days, 90 days, No expiry or Custom date, which adds a date from tomorrow on. It starts on 30 days; a duration counts from the moment you create the key. | Yes |
| Scopes | Full access, or at least one Read or Write box in the table of resources. | Yes |
Next step
Set the rest of your personal settings in Your profile.
Related answers
Written from the Developer screen of web app 1.58.0, with the labels of its EN, FR and DE catalogues.