

A scheduled payment is a payment that you authorise at your bank during the payment flow in Sway. Only banks connected through Open Banking EU allow it. Scheduled payments records these payment orders, each with the date on which the bank executes it.
Before you start
- The Owner, Admin, Member or Support role in the workspace.
- A live bank account at a bank connected through Open Banking EU, and your access to that bank’s online banking to authorise the payment.
Authorise a payment at your bank
- Prepare the payment. Choose Make a payment at the top right, and fill in the form as Draft payments describes, with an Open Banking EU account under From. The Communication takes 18 characters at most, and the earliest Requested execution date is tomorrow.
- Check the summary. Choose Next. Payment summary shows the payment and the result of the payee check: a green tick or an amber shield beside the payee’s name. A notice says that you approve the payment at your bank in the next step. Choose Next again.
- Review the authorisation. The Authorise dialog names the bank that Sway redirects you to, the payee with its IBAN and the amount, and the date until which the authorisation stays valid.
- Authorise at your bank. Choose Authorise. Your bank’s page opens: sign in and confirm the payment with your bank’s strong customer authentication.
- Return to Sway. Your bank sends you back to Sway, which records the payment and shows Payment authorised successfully! Choose Continue to return to the page that you started from.
If the authorisation does not go through, Sway shows Connection failed. Please try again. and records no payment: start the payment again.
The Scheduled payments page
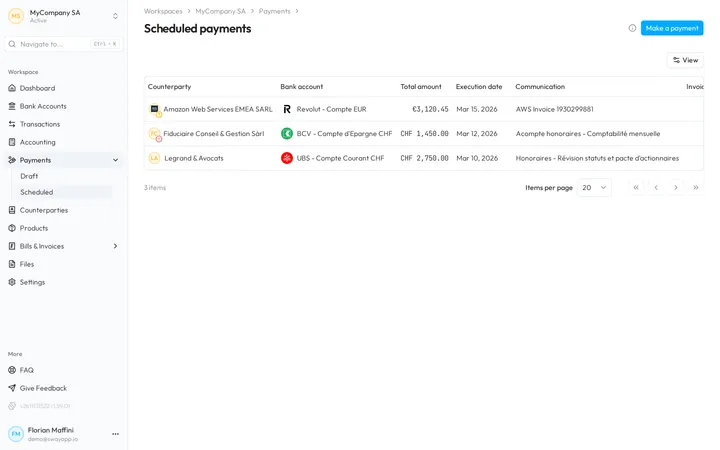
In the sidebar, choose Payments, then Scheduled. The table shows Counterparty, Bank account, Total amount, Execution date, Communication and Invoice, which links to the bill that the payment pays. View adds Reference or hides a column. The page has no search and no filter.
- The sign on a counterparty’s logo, and the details that open when you click a row, work as on Draft payments, without the attachments. A red exclamation mark means that the bank rejected the payment.
- The menu of a row holds Copy ID, Copy communication, Copy reference and Send again, which opens Make a payment with the same details.
With no payment yet, the page shows No payments; Submit a payment opens Make a payment.
Next step
Keep the bank accounts and addresses of your payees up to date in Counterparties.
Related answers
Written from the Scheduled payments screen of web app 1.58.0, with the labels of its EN, FR and DE catalogues.